Musings of Glitter

Friday, February 19, 2016

Free


Y'all know I love getting to look cute AND send a message. Fight Apparel Designs is a company who allows me to do just that. The founder of this shop is absolutely INCREDIBLE! Elise is fighting Stage IV Metastatic Breast Cancer and all of the apparel in her shop is inspired by her faith and her journey. This shirt is inspired by John 8:36 "So if the Son sets you free, you will be free indeed". 

I can honestly say I need this verse on a daily basis. Graduate school has definitely been hard, like really hard- emotionally, mentally and even spiritually. But this verse always reminds me that I am truly free no matter the circumstances I might currently be in. Free from the stress and worry of this world because the one thing that really matters is that Jesus died for my sins and my soul will forever rejoice His name in heaven.

And I have exciting news! Fight Apparel Designs is offering 15% off your entire purchase on their site with code "EMILY" - so be sure to pick up this inspiring tee, along with other cute goodies!

xoxo


jeans (similar)


Friday, February 12, 2016

Valentine's OOTD


Valentine's Day is SO soon. Did January fly by for anyone else too? Can't believe we're almost halfway through February! I'm planning on spending the holiday with my girls. We're heading to see How To Be Single in theaters - it looks hilarious! Not gonna to lie, I'm a-okay that Valentine's day being on Sunday this year. I'm all about celebrating love, but seeing the unending flow of chocolates and flowers all over campus just reminds me of my forever singleness. Just kidding! (well....sort of)

But I'm a big fan of Valentines - who doesn't love an excuse to wear pink and eat a ridiculous amount of candy? I opted for lilac instead of pink this year (still the same color fam, right?). This gorgeous color paired with the high-low hem has me swooning. Totally in love (pun intended). And I layered it over this flirty, flowy floral maxi dress - which has a high-low hem as well. 

And no outfit is complete without some Kendra Scott jewelry. This slate Rayne necklace is one of my new favorites - it's slightly translucent so it goes with everything!

Hope you all have the happiest Valentine's Day!

xoxo


Thursday, February 4, 2016

Ombre Lip Tutorial with Maybelline

This shop has been compensated by Collective Bias, Inc. and its advertiser. All opinions are mine alone. #MNYLooksToLove #CollectiveBias


I'm SO excited to be back again with another makeup tutorial featuring Maybelline! Valentine's Day is just around the corner, so I'm here with another one of my "Looks to Love". If you want to see how I created this fun ombre lip, check out the tutorial below!


Here are a few of the products I'm going to be using - Maybelline's The Blushed Nudes Palette (which is filled with gorgeous rosy tones), Eye Studio Lasting Drama Gel Eyeliner, The Falsies Push Up Drama Mascara and Color Sensational Lipcolor in Sugar Chic.


And I found all of my products at Walmart in the makeup section! There's also an end cap display to where the majority of the products can be found.


I went ahead and applied my foundation, blush and contour which can be seen here. Then I applied my eye color using The Blushed Nudes Palette. I ran the top fifth color (fifth from the left) through my crease, the top sixth on the outer third and lower lash, and the bottom fourth along the outer corner of my upper lid. I wanted to keep the eye fairly simple since the majority of the focus will be on the lips. I finished my eyes with a cat eye using the gel liner and then put on lots of mascara (this mascara is super build-able, which I love)! A little tip when using Maybelline's Eye Studio Lasting Drama Gel Eyeliner - I take a little bit on a thin liner brush and draw the end of my cat eye first, then line my lid and connect the cat eye inward.


Now onto the fun part! To create an ombre lip you'll need three liners in the same color family (one dark, one medium and one light). I chose to do a pink lip, so I used a plum, fuschia and pinky nude. I took the darkest shade first and lined my lips, then filled in the VERY outside corners - leaving 3/4 of my inner lip unfilled. Then I took the medium shade and lined my lips right underneath the darkest shade and filled in my entire lip EXCEPT the very center of my lip (leave a circle in the center of your lips open). Finally I filled in the center with the lightest color. And finally, the best part - take a light lipstick in the same color family - I'm using Sugar Chic from Maybelline which is a creamy light pink - and apply it all over your lips. This just blends all three of the liners together and takes away any harsh lines (but if there are any harsh lines left over, just blend with your finger).


And that's it! So easy and such a unique look for Valentines Day. You can shop all of the products I mentioned here

xoxo


Friday, January 22, 2016

All Bout The Red


Whether you're a Husker fan or a Hog fan, myself being the latter, you're "all bout the red". Or even "all bout the red (lipstick)" -because I'm totally on board for that one too. But whatever red you love - you need this shirt from Philia Clothing! It's a boxy, long sleeve top that can be worn in any season! I styled mine with my go-to plaid button up tied around the waist and my favorite pair of boyfriend jeans - cute, but still casual enough for you to cheer on your team from the stands! And you can get 20% off at philiaclothing.com with code "glitter20"! Outfit details below.

xoxo


jeans (similar)

plaid (similar)


Wednesday, January 20, 2016

70's Vibes


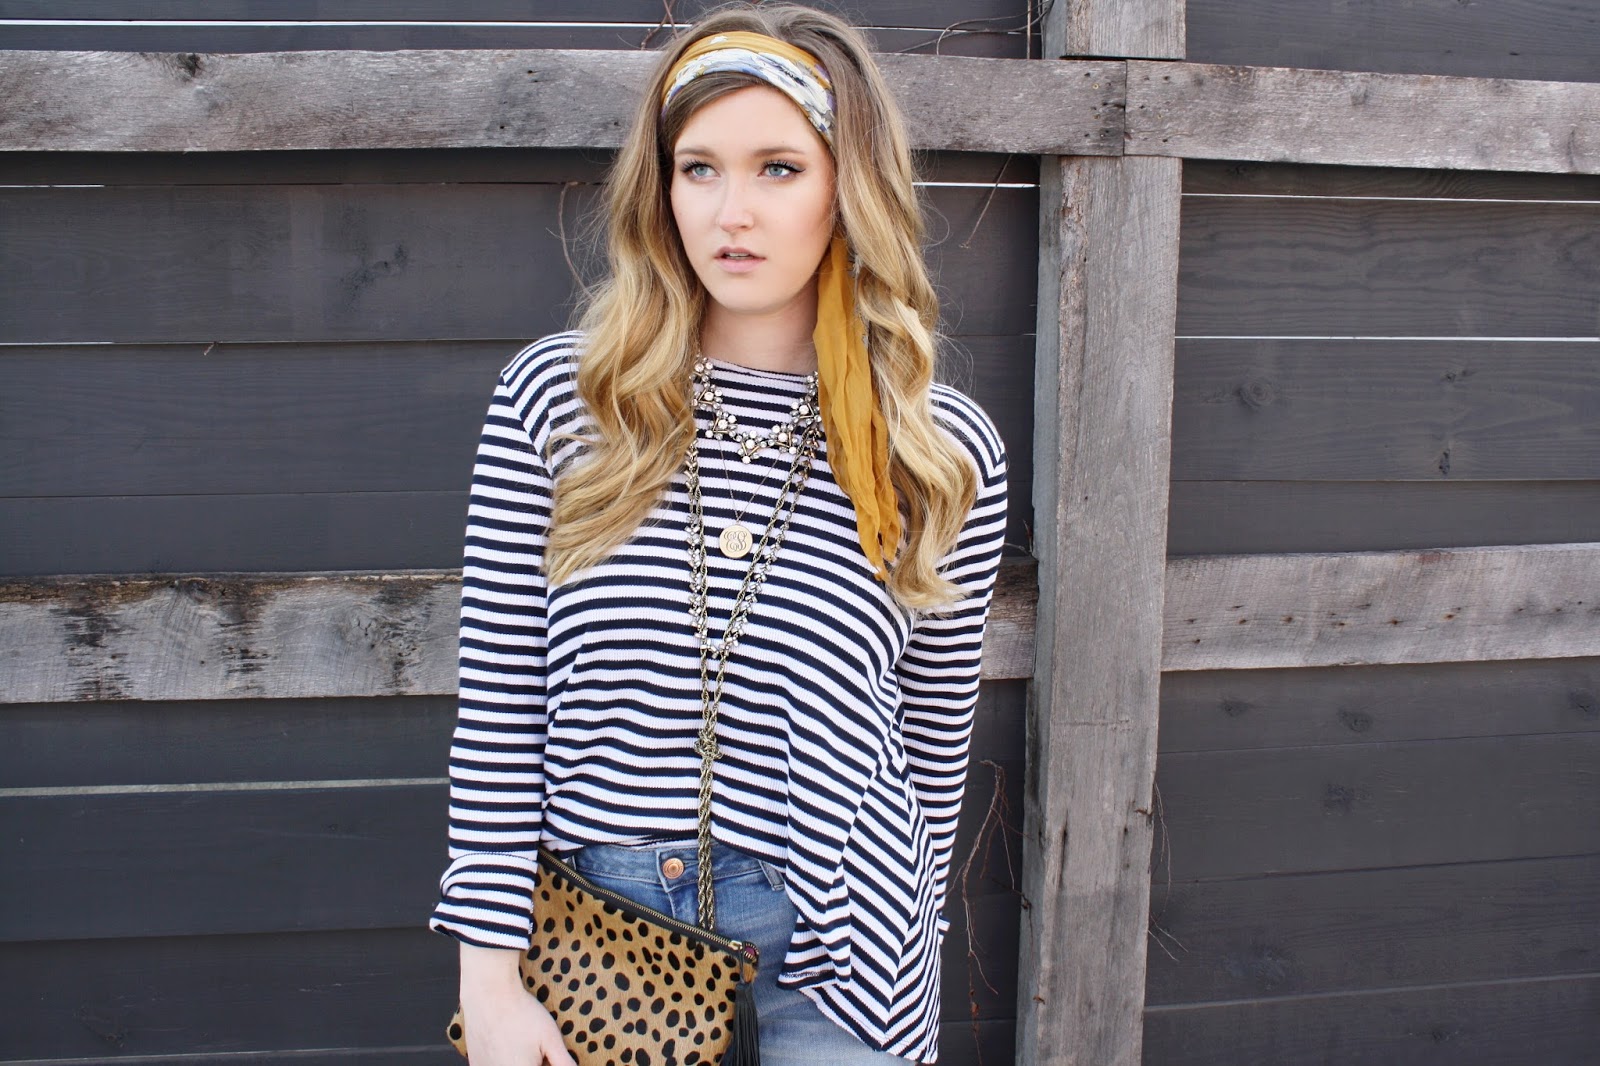
Channeling some super 70's vibes with this look today. I love the fact that bell bottoms are back in style! Don't get me wrong - I'm all about the skinny jean, but bell bottoms are a fun variation from the norm. Plus, this pair just so happens to be high rise - which is the cherry on top (see ya muffin top). 

Stripes have always been my favorite pattern (closely rivaled by polka dots and plaid), so any chance I have to add more stripes to my closet, I do. This long sleeve striped top from Vintage Willow is made of a super comfy ribbed material and has a cute ruffled back. I'm a true believer that you can never own too many stripes (even if I do have 15 stripe shirts). 

And obviously any 70's look has to be topped off with a head scarf. Every time I go to a thrift store I always look at their head scarves. You can find vintage scarfs for crazy cheap - and just throw them in the wash and they're like new! I also layered 4 different necklaces because when in doubt, add more jewelry. And I HAVE to share my excitement because I finally found a locket with my initials on it! There's a fabulous local shop, Mae's, which carries all the vintage jewelry of your dreams. I've been searching for a locket with my initials engraved on it for forever and they finally found this beauty! It's from the 1920's and I'm absolutely obsessed. Always makes me wonder who wore it before me.

Details on this look are below! Enjoy your weekend loves!

xoxo


Jeans (on sale!)

Locket (obviously mine is one of a kind, but you can call and see if they've got one with your initials available!)

Clutch (similar)


Monday, January 18, 2016

Contouring with Maybelline

This shop has been compensated by Collective Bias, Inc. and its advertiser. All opinions are mine alone. #MNYLooksToLove #CollectiveBias


With Valentines Day just on the horizon - I teamed up with my friends over at Maybelline to create a look to love. Y'all know I'm a makeup junkie - so I can't wait to tell y'all about my contour-highlight routine! Having flawless skin is key to any makeup look, so I always perfect my base before I do anything to my eyes and lips. Without further ado, here we go!


I headed to Walmart to pick up a few new products from Maybelline. I love getting makeup at Walmart because it's super easy to run in and out - AND I can get all the items I need without breaking the bank. You'll find all of the products I mention in today's post at the end of the Maybelline aisle in the makeup section.


First things first. You HAVE to have a good foundation. I used Maybelline's new Dream Velvet Foundation in 15 (Ivory). It's a hydrating, matte foundation with a gel-whipped texture. And just as important as the foundation, is the tool you use to apply it. Maybelline just came out with their own sponge - the Dream Velvet Blender! If you keep up with the makeup world, you know that makeup sponges are the new it item. They apply foundation super smoothly and keep the "cake face" away. To use the sponge, simply get it wet, then dry it with a towel so it's a little damp.


To apply the foundation, I squeeze a little bit of the product onto the back of my hand, pick up a little with my sponge and bounce the sponge on my face. I use the sides of the sponge for the broad parts of my face (cheeks, forehead, chin) and then use the tip to navigate smaller areas (around the eyes, nose and mouth). After I finish my foundation, I take a little bit of concealer under my eyes, around my nose and anywhere I need extra coverage. I have SUPER oily skin - and although I love the finish of this foundation, it's a little moisturizing for my skin type. So to keep my foundation and concealer in place all day, I set everything with a translucent powder (and I went ahead and did my eyes since today we're focusing on the contour).


Next, I start in on the contour. If you noticed the picture of the Maybelline Master Contour Palette earlier, you'll see that it comes with a contour shade, blush and highligher. It's the perfect all in one kit! It's also available in two different shades so it will work for any skin tone (I'm using the light to medium palette). I LOVE a good contour. It literally shaves 5lbs off your face and makes everything look better. I take a medium sized tapered brush (this gives you more control) and swipe a little bit of product right under my cheek bones (yes, I make the kissy face), then take a little on my jaw line and on my temples. Just make sure that it's all nicely blended. You don't want lines on your face. The whole point of contouring is to enhance the natural shadows of your face, so you want to make sure it's really feathered into the rest of your makeup to avoid looking like a clown.


To finish it off, I took the blush included in the palette along my cheekbones (right above the contour shade) and a tiny bit on the tip of my nose. Then I took the highlight shade on a fan brush and dusted it on the very top of my cheekbones (right above the blush), down the center of my nose, under my brow bone, on my cupids bow and in the inner corner of my eye. The final touch - setting spray! And voila, that's it!

I hope you all enjoyed this tutorial and I can't wait to bring you more makeup tutorials in the future! You can get all of the products mentioned here!

xoxo